
Development
Step-by-Step Guide to Rebuilding a Landed Property in Singapore
Oct 8, 2025
-
Renee Ang
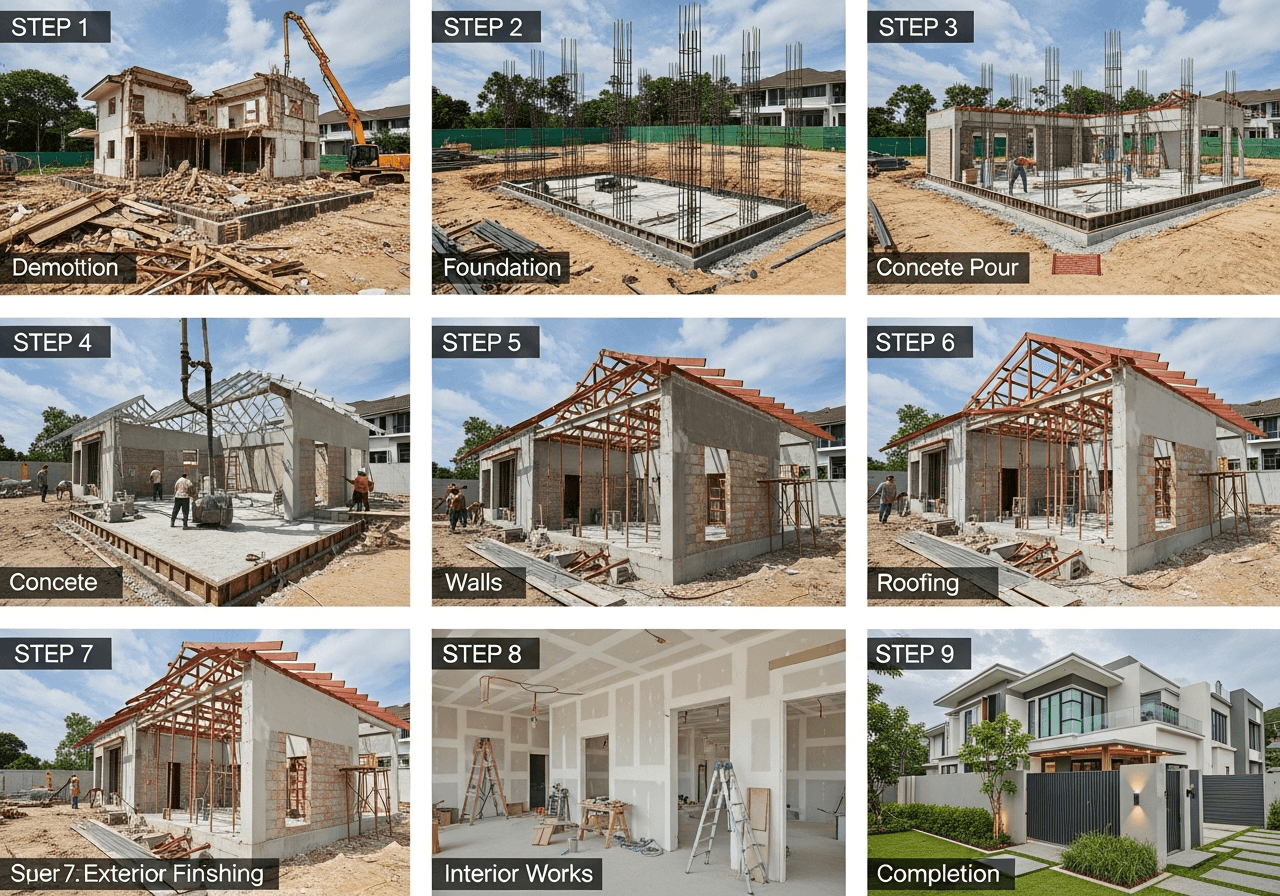
Step-by-Step Guide to Rebuilding a Landed Property in Singapore
Rebuilding a landed home in Singapore is a big undertaking, but if done properly, the result is a completely new house that reflects your lifestyle today, larger spaces, brighter interiors, better ventilation, a more efficient layout, and modern M&E systems.
This guide breaks down the real-life rebuild process used in Singapore, especially in districts with older landed homes like Serangoon Gardens, Thomson, Upper Bukit Timah, Frankel, Opera Estate, Kovan, and Watten Estate.
If you’re a condo upgrader who just purchased a 30-year-old terrace or semi-D, this will give you a clear picture of what to expect.
1. Initial Assessment & Site Visit
Before anything is designed, the contractor or architect needs to visit the site. This isn’t just a formality, landed houses in older estates often have quirks that affect feasibility.
What typically gets checked:
Existing structural condition
Soil levels and drainage (especially for East Coast terraces)
Width of access road (affects demolition trucks)
Existing sewer line location
Height of neighbouring properties
Whether the house sits on sloped land (common in Upper Bukit Timah / Hillview)
This stage helps determine whether the project leans toward a straightforward rebuild or requires additional engineering, such as piling or retaining walls.
2. Understanding What You Want (Lifestyle Planning)
Rebuilding isn’t just about removing the old house, it’s about designing a new one that suits your life for the next 20–30 years.
Many homeowners upgrading from condos often request:
A proper dry + wet kitchen
A larger master suite with walk-in wardrobe
More storage
A helper’s room with proper ventilation
Home office or study room
Multi-gen layout for aging parents
Enclosed air-conditioned dining
Families in Serangoon Gardens or Thomson tend to prefer open, connected family spaces, while East Coast owners often ask for larger balconies to catch sea breeze.
3. Concept Design Stage
This is where the architect starts sketching possible layouts.
Typical decisions made here:
How many storeys?
Is an attic allowed?
Do you want a lift?
Open-concept living or zoned spaces?
Where should the staircase go?
Should the façade be modern, minimalist, or tropical?
Common Singapore constraints also apply, such as:
URA envelope control guidelines
Building height limits
Rear/side setback requirements
Balcony and roof guidelines (especially in 3-storey zones)
In landed clusters like Opera Estate or Frankel, light wells and skylights are frequently proposed because many terraces have limited side windows.
4. Detailed Design & Cost Estimation
Once the concept is confirmed, architects produce detailed floor plans, 3D renders, and material proposals. The builder then prepares a more accurate cost estimate.
This stage includes selecting:
Tile types
Window systems (sliding vs. casement vs. full-height glass)
Carpentry finishes
Kitchen layout
Toilet fittings
Façade materials
Condo upgraders often underestimate how much detail goes into landed construction. Unlike condos, where layouts are predetermined, every little decision affects cost and timeline.
5. Authority Submissions (URA, BCA, SCDF, PUB)
This is the paperwork stage, but it’s critical.
A full rebuild requires approval from:
URA – planning & envelope controls
BCA – structural design, demolition approval
PUB – drainage & sewer line considerations
SCDF – fire safety, especially for semi-Ds and bungalows
NParks – if mature trees are on site
Submission timelines vary but typically require 3–6 months.
Homes in places like Bukit Timah or Thomson that fall under special planning areas may take slightly longer due to additional scrutiny.
6. Demolition Works
When approval is granted, demolition begins.
Typical steps:
Disconnect utilities (water, gas, electricity)
Erect hoarding and safety barriers
Remove roof, windows, internal partitions
Tear down structural elements
Clear debris with trucks
Terraces in tight lanes like Joo Chiat, Telok Kurau, or Serangoon Gardens sometimes need smaller trucks or more trips, which affects time and cost.
Demolition usually takes 2–4 weeks.
7. Foundation & Structural Works (Most Important Stage)
This is where your new home takes shape, literally.
Structural works include:
Foundation excavation
Piling (if needed; common in East Coast or soft soil areas)
Installing rebar, formwork, concrete
Building beams, columns, floor slabs
Staircase structure
Attic floor construction
Roof slab or pitched roof structure
If you’re adding an attic (popular in Thomson and Serangoon Gardens), the engineer will design heavier structural elements to support it.
Typical timeline: 4–6 months.
8. Brickwork, Roofing & External Shape
Once the skeleton is built, brick walls and façade elements go up.
This is when your house finally starts to look like a house.
Façade materials selected earlier, such as timber cladding, stone tiles, or aluminium, are installed later during finishing.
9. Mechanical & Electrical Works (M&E)
This stage involves:
Full electrical rewiring
Aircon piping (multi-split systems are standard)
Plumbing & sanitary pipes
Hot water system planning
Smart home conduits
Gas piping (if applicable)
Older landed houses often have outdated plumbing layouts, so condo upgraders appreciate having a fresh, properly designed system.
M&E takes about 2–3 months, overlapping with other works.
10. Window Installation, Waterproofing, Flooring
These stages matter for long-term comfort:
✔ Waterproofing
Especially in bathrooms, balconies, and roof areas.
Terraces in the East Coast region often require enhanced waterproofing because of wind-driven rain.
✔ Windows
Many homeowners now prefer large glass openings to bring in more light, particularly for terrace houses in Serangoon Gardens and Kovan where natural light is limited.
✔ Flooring
Tiles, vinyl, engineered wood, or marble depending on your design direction.
11. Carpentry, Kitchen, Toilets & Interior Completion
This is where the home starts to feel like yours.
Carpentry includes:
Kitchen cabinets
Wardrobes
TV console
Shoe cabinets
Study desks
Storage spaces
Singapore homes almost always need more storage than initially planned, especially for families upgrading from condos.
Toilet fittings are also installed here, including sanitary ware, glass shower screens, and lighting.
12. Façade Finishing, Painting & External Works
Front façade finishing (tile cladding, paint, glass railings) happens toward the end.
External works include:
Car porch
Sliding gate
Landscaping
Boundary walls
Driveway tiling
Drainage upgrades
Houses in flood-prone parts of the East Coast sometimes need special drainage considerations.
13. Final Inspection & Handover
Before handover, the contractor conducts:
A full defects check
Touch-ups
Painting adjustments
Waterproofing tests
Electrical and plumbing testing
You also walk the house with the builder to ensure everything meets expectations.
14. Total Rebuild Timeline
On average:
Stage | Duration |
Design & planning | 1–3 months |
Authority approval | 3–6 months |
Demolition | 2–4 weeks |
Structural works | 4–6 months |
M&E + brick + windows | 2–4 months |
Interior + finishing | 3–6 months |
Total | 18–30 months |
Bungalows and houses with basements can take longer.
15. Tips for a Smooth Rebuild (Real Advice from Singapore Homeowners)
1. Don’t rush the design stage
Fixing layout mistakes later is expensive.
2. Avoid overcomplicating the façade
Good architecture is clean and timeless.
Focus on natural ventilation and light instead.
3. Plan storage early
Most condo upgraders underestimate how much they accumulate.
4. Keep a 10–15% buffer
Older landed homes often reveal surprises during demolition.
5. Choose a builder who specialises in landed rebuilds
Not all renovation contractors understand the depth of structural work required.
16. Useful Links
Related


